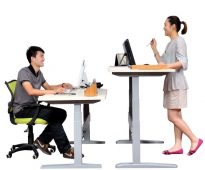
![Furniture must fit our body geometry.](https://designtop.decorexpro.com/wp-content/uploads/2018/03/chtoby-telo-vo-vremya-raboty-nahodilos-v-udobnom-polozhenii-mebel-dolzhna-sootvetstvovat-geometrii-nashego-tela-205x170.jpg)
We make a table from solid wood with our own hands: from the choice of material to the final assembly
Furniture made of solid wood, highly valued at all times. Now it can rightfully be considered a luxury item. However, anyone with elementary carpentry skills and enough desire can make table from an array with minimal attachments.
![wooden table design](https://designtop.decorexpro.com/wp-content/uploads/2017/09/derevyannyj-stol-dizayn-590x590.jpg)
The furniture should be durable, reliable, beautiful, consistent with its functional purpose.
Content
- 1 5 reasons to make a table with your own hands
- 2 Choosing a table model
- 3 What kind of wood is better?
- 4 Necessary materials
- 5 Tools for work
- 6 Making a wood table with your own hands: step by step instructions
- 7 VIDEO: Dining table made of solid wood with their own hands.
- 8 Wooden tables in the interior - 50 photo ideas:
5 reasons to make a table with your own hands
Of course, buying a finished product is much easier and faster, but making it independently has several advantages:
- Price. The cost of the table made of natural wood is quite high.
However, in the manufacture at home, it will decrease by several times.
- Quality. Picking up wood on your own reduces the risk of using low sample materials.
You can choose the breed that will meet all the necessary technical and aesthetic requirements.
- Durabilitydirectly related to the quality of the product assembly. Creating furniture for himself, even a beginning woodworker, will assemble the construction neatly and securely.
Preliminary processing of all boards with special protective equipment guarantees a long service life.
- Design. Despite the huge selection in the stores, there are often situations when everything is like, but I would like to change some small detail.
Making the table yourself, you can take into account all the nuances and create an ideal model for yourself.
- And of course, there is nothing more pleasant than to admire and use your creation every day.
This is a great opportunity not only to save money, but also to bring a piece of your soul into the house.
Choosing a table model
Before proceeding to the selection of material and the creation of a piece of furniture directly, it is necessary to determine its design. The model depends on the functional purpose and features of the room.
For example, if the room is small, it is better to choose compact products.
![table stump](https://designtop.decorexpro.com/wp-content/uploads/2017/09/Stol-pen-590x325.jpg)
In this case, fit a neat round table on 1 leg.
For a spacious dining room, the living room is ideal - a classic rectangular table.
![wooden table design](https://designtop.decorexpro.com/wp-content/uploads/2017/09/derevyannyj-stol-dizajn-590x507.jpg)
It can also be an oval roomy table with a massive underfold.
If there is a need for a product with a large capacity, but the room does not imply the presence of large-sized items, you should think about the sliding or folding design.
![oval wooden table](https://designtop.decorexpro.com/wp-content/uploads/2017/09/oval-derevyannyj-stol-590x340.jpg)
If necessary, the tabletop is extended.
For beginners, it is easier to make a piece of furniture of square or rectangular shape on 4 legs of medium size.
![classic coffee table](https://designtop.decorexpro.com/wp-content/uploads/2017/09/Klassicheskiy-zhurnalnyy-stol-v-vintazhnom-interere-590x572.jpg)
Such a table is made without additional mechanisms.
What kind of wood is better?
Each type of wood has its own characteristics that should be considered when designing furniture.
![fusion table](https://designtop.decorexpro.com/wp-content/uploads/2017/09/fyyuzhn-dvorik-590x443.jpg)
People have long been considered the tree as the main building material.
For a more convenient and detailed comparison of the characteristics, we turn to the table.
Table 1. The most common types of wood used in the furniture industry
Title | Average density kg / m3 | Chipping strength | Specifications |
Oak | 700 | 9,9 | Very strong breed, resistant to rotting processes. It has a beautiful, noble texture. |
Beech | 670 | 12,1 | The representative of hard rock, easy to handle, malleable. However, it is prone to decay, which requires careful antiseptic treatment. When drying, it deforms more than oak. |
Larch | 660 | 9,8 | Strong, resistant to rotting and deformation, has a tendency to cracking. Therefore, it is not recommended for rooms where humidity and temperature changes are constantly observed. |
Birch tree | 630 | 9,0 | Rather strong, resistant to deformation, chipping and cracking, but at constant humidity tends to rot. This disadvantage is easily neutralized with the help of antiseptic processing, as the wood is easily soaked with special compounds. |
Pine | 500 | 7,4 | Durable, soft, light, slightly deformed. Because of its natural characteristics malleable at work. It is easily impregnated with antiseptic compounds. |
Spruce | 450 | 6,8 | Less smooth texture in comparison with pine, has a greater number of knots. Not so well treated with antiseptic, more capricious in processing. |
Aspen | 380 | 6,5 | The texture has no special expressiveness, the color is whitish-green. Due to its softness, it does not crack, it is easily processed, it is not susceptible to rotting. However, on the surfaces of this material may remain traces of mechanical effects (for example, if the child will draw with a strong pressure on the pen or pencil) |
Fir | 370 | 5,9 | Soft breed, badly transfers moisture, is subject to rotting processes, therefore is not suitable for furniture to be used outdoors or in rooms with high humidity. It is easily processed, which will simplify the work of novice masters of joinery. |
So, having carefully studied the table, it becomes clear that soft woods (aspen, fir) will be easy to work, but during the service they may be disappointed because of their exposure to mechanical stress and low moisture resistance. It is better to opt for harder varieties such as pine, larch, beech and oak.
![table solid wood](https://designtop.decorexpro.com/wp-content/uploads/2017/09/stol-massiv-dereva-590x441.jpg)
We did not consider the heavy-duty wood species (hornbeam, yew, etc.), since their processing is extremely difficult at home.
Necessary materials
For the manufacture of the table will require the following materials.
- Timber 40 mm x 40 mm for fastening the support part to the table top and giving the structure strength and stability.
- Bar 70 mm x 70mm for the manufacture of legs. If the design provides for classic carved balusters, and the experience of processing wood does not allow you to make them yourself, you can always find the right option in the furniture accessories shop and purchase ready-made elements of the product.
- Boardsand for the table top (thickness not less than 40 mm).
- Glue for wood.
- Furniture dowels and confirmats.
- Antiseptic.
- Lacquer or azure for processing wooden products.
![materials](https://designtop.decorexpro.com/wp-content/uploads/2017/09/materialy-590x393.jpg)
The number of boards depends on their width and the estimated size of the table.
Tools for work
All the necessary tools for the work can be divided into 3 groups.
- Measuring instruments:
- Metal ruler 50-100 cm;
- Roulette;
- Metal square;
- Manual level 50-80 cm.
![instruments](https://designtop.decorexpro.com/wp-content/uploads/2017/09/stolyarnyi-instrument-590x393.jpg)
Tools for creating furniture with their own hands.
- Tools for working with wooden surfaces:
- Saw / handsaw;
- Jointer;
- Grinding machine, sandpaper.
![instruments](https://designtop.decorexpro.com/wp-content/uploads/2017/09/instrumenty-590x389.jpg)
The necessary set of tools.
- Tools to assemble the product:
- Wedge or screw clamps;
- Kiyanka (suitable with both wooden and rubber brisk)
- Screwdrivers with a different point;
- Drill, screwdriver.
Making a wood table with your own hands: step by step instructions
Table top
Process all Boardsand.
Having achieved a perfectly flat and smooth surface, drill holes in each end for dowels with a pitch of 10-12 cm (for extreme boards, they should be made only on one side).
![the boards](https://designtop.decorexpro.com/wp-content/uploads/2017/09/doski-590x443.jpg)
All edges must be milled and the surface sanding.
After thorough cleaning of shavings and dust, they should be missed with special wood glue (PVA can be used).
![dowels](https://designtop.decorexpro.com/wp-content/uploads/2017/09/shkanty-590x443.jpg)
Then the boards are fastened together using wooden dowels placed in the prepared holes.
Important! When gluing, direct the pattern in different directions. This increases the strength of the product, reduces the risk of its deformation.
![clamps](https://designtop.decorexpro.com/wp-content/uploads/2017/09/zazhimy-590x443.jpg)
When the canvas of the boards is assembled, it is necessary to dry it, securing it with clips.
After complete drying, cut off the excess glue with a construction knife and sand the surface with a grinding machine.Prepare the finished shield with a special antiseptic.
Thus, the manufacture of wood linen requires one day of work.
Underframe
Consider the process of creating a standard undervoltage (4 legs and a rectangular frame).
Saw off the required size bars for all elements, process them with a sanding machine or manually with emery paper and cover with antiseptic.
![underframe](https://designtop.decorexpro.com/wp-content/uploads/2017/09/podstolye-590x443.jpg)
To save time, it is better to perform the procedure in parallel with the table top.
When the prepared elements are ready, fasten a pair of legs with smaller transverse bars using furniture screws.
![legs](https://designtop.decorexpro.com/wp-content/uploads/2017/09/nozhki-590x443.jpg)
Pre-they can be smeared with glue.
Important! Screws are screwed from the inside at an acute angle to the surface.
In the same way, fasten the legs with long bars.
![holes](https://designtop.decorexpro.com/wp-content/uploads/2017/09/otverstiya-590x443.jpg)
Drill holes in the center of each leg to further assemble the furniture.
If you plan to do table two-color painting of the prepared elements should be carried out before final assembly. If the product will be the same color, assemble the structure and paint it as a whole.
Final assembly
Place the worktop face down on a flat, clean surface and begin work:
Attach the underframe from above as it should be fastened and draw a pencil on the inside.
![assembly](https://designtop.decorexpro.com/wp-content/uploads/2017/09/sborka-590x443.jpg)
Mark the joints of parts with a pitch of 200 - 230 mm on both surfaces.
Drill holes in the underframe and tabletop, remove chips from them, spread them with glue and assemble the product with the help of special furniture fasteners (as in the manufacture of wooden cloth). If necessary, use a mallet.
![table ready](https://designtop.decorexpro.com/wp-content/uploads/2017/09/stol-gotovyj-590x443.jpg)
Leave the product to dry for a day (minimum 12 hours).
The final stage
When the construction is assembled, perform the final polishing, apply decorative elements in accordance with the design project and cover with several layers of varnish or azure.
![painted table](https://designtop.decorexpro.com/wp-content/uploads/2017/09/stol-pokrashenyj-590x443.jpg)
By sticking to the instructions, you can easily make a wood table with your own hands.
Important! Each coat should dry completely. Therefore, the final decoration of the table will take at least another day. Therefore, the process of creating your own masterpiece from an array will take you about 3-4 days.
Having spent the minimum amount of cash and a few days, you will get a reliable and durable lunch table of Boardsand oak, pine or other favorite material, and a lot of positive emotions.
![table option](https://designtop.decorexpro.com/wp-content/uploads/2017/09/variant-stolika-590x504.jpg)
So you learned how to make your own table from solid wood.
VIDEO: Dining table made of solid wood with their own hands.
Wooden tables in the interior - 50 photo ideas:
![Furniture must fit our body geometry.](https://designtop.decorexpro.com/wp-content/uploads/2018/03/chtoby-telo-vo-vremya-raboty-nahodilos-v-udobnom-polozhenii-mebel-dolzhna-sootvetstvovat-geometrii-nashego-tela-205x170.jpg)
![Folding round table made of wood](https://designtop.decorexpro.com/wp-content/uploads/2017/11/raskladnoj-kruglyj-stol-iz-dereva-205x170.jpg)
![Sewing table](https://designtop.decorexpro.com/wp-content/uploads/2017/10/Stol-dlja-shitja-205x170.jpg)
![Wooden street table for giving](https://designtop.decorexpro.com/wp-content/uploads/2017/09/Derevjannyj-ulichnyj-stol-dlja-dachi-205x170.jpg)
![Table-book Falcon SP-11.1.](https://designtop.decorexpro.com/wp-content/uploads/2017/10/Stol-knizhka-Sokol-SP-11.1.-205x170.jpg)
![super glue clerical](https://designtop.decorexpro.com/wp-content/uploads/2017/04/Super-Klej-kancelyarskij.jpg)