Build a drywall wall with your own hands - easy!

However, starting an independent construction of the partition, it is important not to lose sight of anything. After all, only in this case, you can achieve proper quality and durability, to avoid unnecessary disturbances in the installation process and at the same time save money.

Metal profile is a guarantee of structural strength.

Having decided on the place of building a wall made of plasterboard with your own hands, you can start forming a list of materials and tools.

Where to begin?

Having decided on the place of building a wall made of plasterboard with your own hands, you can start forming a list of materials and tools. At this stage, you will need to make a number of measurements that will be needed for further calculations. What matters is not only the height and width of the room at the place where the partition is erected, but also the dimensions of the doorway and, if such are planned, of the windows. After all sizes have been fixed by you, you can arm yourself with a calculator and start drawing up a list of necessary materials.

Metal profile frame

After all, only in this case, you can achieve proper quality and durability, to avoid unnecessary disturbances in the installation process and at the same time save money.

Calculation of the necessary materials

The basic list of materials is as follows:

  • guide and rack profile;
  • sealing tape;
  • screws and dowels for fixing the profile;
  • drywall;
  • self-tapping screws for fixing drywall;
  • wooden beam to strengthen the profile around the doorway;
  • heat insulating material;
  • sleeve for insulation of electrical wiring.
Installation of drywall on the frame

What matters is not only the height and width of the room at the place where the partition is erected, but also the dimensions of the doorway and, if such are planned, of the windows.

In order to prevent unnecessary expenses or to purchase insufficient quantities of material, it is advisable to carry out preliminary calculations. With drywall everything is very simple: it is necessary to determine the area of ​​the future partition. To do this, we multiply the height of the room by its width at the installation site of the plasterboard wall and subtract the area of ​​the door opening from the number obtained. If you plan to single-layer lining HL, then the result must be multiplied by 2, in the case of a two-layer - by 4. For the wall it is best to take standard sheets with a thickness of 12.5 mm. Depending on the characteristics of the room you have to make a choice between simple and moisture-resistant drywall.

We assemble the skeleton of the future partition with our own hands

In order to prevent unnecessary expenses or to purchase insufficient quantities of material, it is advisable to carry out preliminary calculations.

The guide profile is needed to connect the supporting part of the structure with the floor and ceiling. Based on this, we simply multiply the length of the future wall by 2 and get the desired amount of profile. With a rack profile a bit more complicated.The recommended distance between the uprights is 60 cm, so you first need to divide the width of the room measured in cm by 60, thus recognizing the required number of racks. Then the resulting number is multiplied by the height of the room. To the resulting number, add two more wall lengths - these are jumpers for structural reinforcement.

Shelves in plasterboard partitions

With drywall everything is very simple: it is necessary to determine the area of ​​the future partition.

If there is a door in the plans, then the posts adjacent to the door must be strengthened with the help of a wooden bar of the appropriate thickness. An alternative to timber can serve as a reinforced thick-walled profile AU. The amount is simple: the length of two pillars adjacent to the door plus the width of the doorway.

Sliding partitions for zoning the space in the room

The guide profile is needed to connect the supporting part of the structure with the floor and ceiling.

Cooking tool

In order to avoid any problems in the process of building a wall made of plasterboard, it is necessary to prepare in advance the necessary tools for the work. You will need:

  • roulette;
  • plummet and level;
  • scissors for metal;
  • construction knife;
  • plane;
  • screwdriver;
  • grater.
Plasterboard partitions with doorway

Depending on the characteristics of the room you have to make a choice between simple and moisture-resistant drywall.

The key to success: proper markup and installation

The most important and crucial moment in the assembly of the frame of the future partition is the markup. It is better to start from the floor. Then, using a plumb line, the walls and ceiling are marked. It is very important not to forget about several nuances:

  1. When marking the plasterboard wall, it is necessary to bind to two walls perpendicular to it and to average the indicators. Without doing this, you can get a room with a visual curvature, because in buildings, right angles are very rare and the wall opposite the partition can be oblique with respect to the other two.
  2. The line you have drawn is a pointer for laying a guide profile, respectively, the partition will be behind this line for the thickness of sheets of drywall, plaster and finishing material.
Advantages of drywall partition

The recommended distance between the uprights is 60 cm, so you first need to divide the width of the room measured in cm by 60, thus recognizing the required number of racks.

Work with metal profile

Having finished with a marking it is possible to start fastening of the directing profile. It is laid using sealing tape. Fix the guide profile with dowels and screws. Between fasteners there should be an interval of no more than 50 cm. The edges of the guide profile are fixed without fail.

The next stage of the assembly of the frame is the installation and fixation of the rack profile along the edges of the guide. Then face up to each other racks are installed doorway. The distance between them should be subject to the upcoming HL lining. Next, the remaining racks are mounted, the first of which is located at a distance of 55 cm from the wall, the next ones are placed with an interval of 60 cm.

photo living room and bedroom

Plasterboard plating is simple, but requires compliance with certain rules.

The distance between the posts is measured from their centers. Bearing profile is recommended to first put in the lower guide, then in the top. Racks are fixed only after checking its position by plumb or level. If there is a dwelling on the floor above, it is advisable to use construction film when laying the profile. Its laying in the place of contact between the two profiles will help to avoid the characteristic squeak that is heard during a short-term increase in load.

The next step will be the installation of horizontal struts designed to strengthen the structure. To do this, you need to cut the profile of the desired length, which is equal to the spacing between the uprights plus 30 cm. Then, on the basis of the cut, marks on each side are made 15 cm from the cutting line.After that, the profile sidewall is incised at an angle of 45 degrees, with a slope from the edge to the mark, and give it a U-shape. The workpiece is placed between the racks and fixed. The resulting ears are mounted on the outside of the carrier profile.

dry plasterboard ceiling

From the correctness of cutting depends on the density of the sheets at the junction.

Similarly, the horizontal lintels of door and window openings are installed. However, if they are planned to be rounded, then an additional strut should be fixed between the stand and jumper at the right angle.

Communications

An important point when creating a wall of plasterboard - laying electrical wiring. First, it is threaded into a protective metal or non-combustible plastic corrugation sleeve. Then in the bearing profile in the right places are made holes of the appropriate diameter. It is important to bend the edges of the hole in one of the sides and bend in order to prevent damage to the wiring. Then the wires are pulled to the desired points of the structure.

Wall thickness

A cardboard layer is cut through the contoured line with a construction knife, then the edge of the support is brought under the cutting line, and the plaster is carefully broken off.

How to avoid mistakes?

Plasterboard plating is simple, but requires compliance with certain rules. So, in order to avoid the appearance of cracks as a result of subsidence, it is recommended to leave a 10-15 mm gap at the junction of the drywall sheets and the floor along the bottom edge of the wall. And the screws are screwed into the hl with a depth of 1 mm so that the cap does not break through the top layer of cardboard.

Plasterboard partitions photo design

Optimal option if the wall is not planned to mount weighty interior items.

From the correctness of cutting depends on the density of the sheets at the junction. The best result will be with the following procedure. After placing the sheet on a flat surface, measurements are taken, the boundary is marked with a pencil. A cardboard layer is cut through the contoured line with a construction knife, then the edge of the support is brought under the cutting line, and the plaster is carefully broken off. Then the sheet is turned over and again placed by the line of cut on the edge of the support. The second layer of cardboard is cut, but not through, and gently peels off.

Decorative partition with hl

This is a fairly durable material and even large sheets can be laid independently, the main thing is to do it without jerking.

Single layer skin

This is the best option if the wall is not planned to mount weighty interior items. At possible points of installation of wall lighting fixtures, it is necessary to reinforce the drywall with plywood or build in an additional strut into the frame.

Partition in the room

Then in the bearing profile in the right places are made holes of the appropriate diameter.

If only hl are available to you, the length of which is less than the height of your apartment, then this is easy to fix without compromising the strength of the wall. You just need to use the experience of professionals when creating a wall with your own hands. The space not covered by the sheet is sheathed with fragments of the desired size. At the same time, it is necessary to avoid matching the seams on the same level, therefore throughout the entire wall it is necessary to alternate whole sheets and their fragments. That is, if a sheet is sewn in the first row from the bottom, and a fragment is sewn on top, then in the next row there should be a fragment from the bottom and a whole sheet from above.

Partition for zoning rooms from drywall photo

An important point when creating a wall of plasterboard - laying electrical wiring.

On all joints of drywall should be chamfer. If the thinning of the sheet to the edge is not, then it must be formed using a planer. The edge of the sheet is thinned at an angle of approximately 22 degrees, but in such a way that a reduction in thickness of no more than 4 mm is observed on the cutting line. Adjacent to the boundaries of the wall edges hl opposite, should be devoid of chamfer.

Double-skinned

A two-layer plasterboard wall plating is practiced when it is necessary to install a partition of increased strength.The cladding rules differ little from a single-layer one, with one exception: the joints of drywall sheets in the lower layer of the cladding do not have to be processed to form a chamfer. It will be needed only on the sheets of the upper layer.

partition in the bedroom

Between fasteners should be an interval of not more than 50 cm.

When lining the frame, it is also important to ensure that the seams do not match. To do this, the top layer is sewn with an offset of half the width of the sheet. In addition, it is important to increase the number of fixation points. Therefore, if with a single-layer lining there is enough fastening with screws with an interval of 25-40 cm, then with a two-layer one, fixation is necessary on the profile with an interval of 15-20 cm.

drywall partition design

When working with hl avoid sharp movements.

Arch

If there is a desire to make a semicircular door or window opening, you can independently bend a cut of the required size. To do this, you will need a skeleton of the required radius, which can be made from scraps of the same drywall and bars.

The original arch of plasterboard

Adjacent to the boundaries of the wall edges hl opposite, should be devoid of chamfer.

Preparing everything you need, cut off a fragment of the hl of the desired size. Then, one of its sides must be perforated with a needle roller and moistened with a sponge before the formation of a water mirror. After that, the workpiece is moved to the prepared in advance frame and gently bend. The edges are fixed and left in this position until dry. After one hour, you can remove the clips and, if the workpiece does not seem loose to the touch, proceed to the installation.

Drywall design

In addition, it is important to increase the number of fixation points.

First, the drywall arch is fixed in the center and edges, then the screws are screwed in at all points of contact of the drywall with the frame. During the primary consolidation of the sheet, it is important not to turn the screws, leaving the cap 1-2 mm above the surface. The caps are sunk after the sheet has completely dried.

Interroom arch

It is important to carry out all the work at a room temperature not higher than 15 degrees.

Heat and sound insulation

An empty wall of plasterboard is like a drum that does not store heat. Therefore, immediately attend to heat and sound insulation. The required amount of material is calculated based on the area of ​​the wall and the thickness of the profile. The choice of material depends entirely on your preferences and financial capabilities. Comparative characteristics of the most common materials can help you navigate.

Material Virtues disadvantages
Mineral wool Durability

Does not burn

Not rotting

Care must be taken when laying.

Requires steam and waterproofing

Stone wool Does not burn

Not rotting

High price


Styrofoam Affordable price

Ease of installation

Is burning

Requires waterproofing

Polystyrene Strength

Ease of installation

Is burning

The cost is higher than that of the foam

DIY plasterboard partition

Having finished with a marking it is possible to start fastening of the directing profile.

Laying soundproofing material is made before lining the second side of the wall. It is important to compact the material, preventing gaps between the frame and the layers of thermal insulation. Also, before laying, make sure that the electrical wiring is connected to all planned points of the wall.

Finishing

First you need to lay the mounting grid along the joints of the hlc and align the groove formed by the chamfers with the general level of the wall with the starting putty.

An example of a wall with a doorway before plastering

The most important and crucial moment in the assembly of the frame of the future partition is the marking

The angle of the doorway is recommended to strengthen, using the building area. It is placed on the starting putty and tightly pressed to the surface. Then the putty removes excess putty, simultaneously aligning it with the overall level of the partition. The angle between the walls, it is desirable to handle using serpyanka.

Partition device

In order to avoid any problems in the process of building a wall made of plasterboard, it is necessary to prepare in advance the necessary tools for the work.

The last step is to eliminate irregularities and roughness. To do this, you need to finish all the fixing points with self-tapping screws with a finishing putty, while at the same time treating all cracks and chips that appeared in the process of work. When the putty dries, it is important to trim the surface using an abrasive mesh and trowel. If in the future you plan to paint the wall or paste over with thin wallpaper, then it is definitely necessary to treat it with a primer.

plasterboard partitions

When marking the plasterboard wall, it is necessary to bind to two walls perpendicular to it and to average the indicators.

What you should pay attention to

It is important to carry out all the work at a room temperature not higher than 15 degrees. Even if you are working with waterproof gypsum plasterboard, attend to the impregnation of the surface with a waterproofing compound at least in the area of ​​the joints. When working with hl avoid sharp movements. This is a fairly durable material and even large sheets can be laid independently, the main thing is to do it without jerking.

Frame for future partition with door

If there is a door in the plans, then the posts adjacent to the door must be strengthened with the help of a wooden bar of the appropriate thickness.

VIDEO: Plasterboard partition. Video Tutorial. Do it yourself. All stages

50 photo design ideas for do-it-yourself plasterboard walls

We recommend related articles.
stool from chipboard do it yourself 
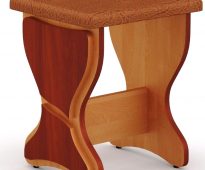
How to make a stool from chipboard do it yourself
When purchasing furniture, you can notice a clear discrepancy between the prices of materials for their manufacture and the final price of the product. This is especially striking when buying fairly simple pieces of furniture, such ...
How to sew a doll box with your own hands?
Caskets are an ideal solution for storing jewelry or cosmetics. To make it unusual, we will hold a small master class on making dolls-boxes from various materials with their own hands ....
tandembox boxes Guides for drawers. Types and features.
Furniture fittings today are presented in a large assortment, which makes it possible to choose. Not so long ago, the facade of the furniture was the same, and she herself looked like a hinged drawer. Now the process of nomination ...
How to make decoupage a simple jewelry box with his own hands in different styles?
Additional decor elements significantly transform the design of each room in the house. Various caskets or boxes are used not only as an accessory, but also perform a practical function. Particularly bright ...
crib sides Sides in a bed for newborns with their own hands. Patterns and Tips
The side for a children's bed is very practical and necessary thing. This element makes it possible not only to protect the baby from the cool draft, but also to weaken its contact with the hard rods ...
We update the upholstery Cat scratched the sofa: measures to save leather furniture
Leather furniture looks rich and beautiful. Such sofas and chairs speak about respectability and good taste. In addition to visual beauty, leather interior wear resistant, and only one detail ...
Add a comment
By clicking a button you agree to privacy policy and site rules set forth in user agreement

Sofas

Furniture

Armchairs