How to sew an apron from guipure on the last bell?

According to many, the school uniform of distant Soviet times is hopelessly outdated. However, more and more often on the last bell the graduates dress up in a chocolate-colored dress and snow-white apron.

This form looks unusually festive and solemn.

How to sew a school apron

Sew it yourself is not difficult. Exactly following the instructions, careful attention to taking measurements and the process of cutting, as well as a great desire to look different, will help to cope with this task.

Necessary materials

Getting Started. To get started, you need the following.

  • Paper, pencil and ruler to make a pattern.
  • Centimeter for taking measurements.
  • The material from which the apron will be made (thin cotton or lace, lace, organza, etc.).
  • Scissors, thread (contrasting color: for basting and for sewing products).
  • Pins to attach the pattern to the fabric for cutting.
  • Sewing machine and the basics of managing it.

Materials and tools for sewing apron.

How to take measurements

It is better if someone from close will help to take the necessary measurements, because an independent “measurement” may have errors.

As an example, take the classic model.

If desired, on its basis, you can bring to life any variations and styles.

So let's start with waist circumference. The measurement is determined by the narrowest point on the body. This will be the length of the future belt on the apron. For strings, you need to add about 1 meter.

Next, the girth of the hips is determined. This measurement is based on the convex points of the buttocks.

The next indicator - the length of the apron. For this measure from the waist measure the desired length. Usually, an apron is made shorter than a dress by 2-5 cm. In general, this value depends on personal preferences and wishes.

The length of the apron strap is measured as follows: a centimeter is passed from the waist up through the shoulder to the waist from the back.

Measurement

To determine the size of the "breast" is better to cut a paper layout and in front of a mirror to attach to yourself. If you are visually satisfied with everything, leave it; if you don’t like it, you can experiment a bit with width and height. The main thing is not to "overdo it" with the width, otherwise the straps will constantly fall from the shoulders.

Try on the pattern for yourself.

Pattern upper parts apron

Now you can proceed to the material. Remember the saying about sevenfold measurement? Carefully transfer the pattern to the fabric, make allowances, recheck, and only then pick up the scissors.


Patterns and their location on the fabric may look like this.

Of course, you can without any special effort to take a ready-made pattern from the Internet or an old magazine. Only such schemes are made by standard standards, but in reality this is rarely found. Therefore, it is preferable to take your measurements and build a pattern yourself.

In order not to be mistaken with the necessary amount of fabric, you can first decompose the details of the pattern on the table and roughly determine what width is needed and what length.

Using the paper pattern, we cut the fabric for the apron without taking into account the length of the frill, just cut the frill and straps.

Typically, patterns are placed on a fabric folded in half. This allows you to make parts symmetrical and more even.

You also need to determine the length of the apron.

Important! Must be allowances for seams. Depending on the texture of the fabric, they are different. On average, if the fabric is not sprinkled, add 1 cm.

Stages sewing apron

So, you can start creating a masterpiece.

At the first stage, we process the breast: we do the top hem and we need to grow it.

The bib should be slightly narrowed to the bottom.

Then we connect the breast and straps.

Double straps are made.

Two parts of the left strap fold face to face, and between them we place the breast. We scribble.

Do the same with the right strap. Then, turning out, we lay the finishing line.

The outer edges are bent inward and also sewn with a finishing line.

The upper part is ready.

Making the bottom of the apron begins with the processing of the bottom of the part.

Process the edges of the bottom of the apron.

Then the belt is sewn to the top.

Prepare the belt in advance.

It is important to control that the middle parts match. Then connects the lower part of the apron and breast with the straps and belt. If desired, you can use braid, lace or frills. They are sewn to the bottom of the product, to the straps, making it slightly wider on the shoulders so that the “wings” are formed, as well as to the upper part of the breast.

At the very end, the straps are sewn to the belt at the back.

Apron on the last bell of white guipure

Guipure - airy and lightweight material. It is hardly possible to come up with a more suitable fabric for such a solemn occasion as the last bell before the prom.

An apron will require about 3 meters of fabric 0.6 m wide, and 8 m of sewing for finishing (4 cm wide).

First, cut out the base of the lower part without a frill.

Bottom part.

Then do the straps. In this case, the straps will sew.

Please note that the length of the cut material for the shoulder strap should be the length we actually measured at the beginning, plus half of this value.

To make a frill, the length of the straps is multiplied by 1.5. It turns out the drape of the desired volume. Then cut out the breast.

Breast apron.

And, finally, we are determined with a belt. It will also be sewing.

The belt is also cut out of guipure.

As a result, before approaching a sewing machine, something like this is obtained.

The outlines of the future product are already visible.

First, on the overlock, sewing is attached to the frills of the straps.

Cooking straps.

Then we connect the straps with the breast.

We try to handle the material carefully.

Sew a frill to the bottom.

The folds should be evenly distributed around the entire circumference.

Now sew the belt. To do this, its middle must be combined with the middle of the breast and the middle of the lower part. To outline.

We combine the middle of the belt and the middle of the upper part, we do the roughing, laying the small sweet ones.

In the process of basting to make the planned folds on the bottom. Stitch. And then pave the finishing line.

Tuck the belt, not forgetting to make a finishing line.

At the end of work sew straps from behind. And there is a little trick. It is better if the straps at the attachment point to the belt are narrow. Then the frill looks spectacular. If you leave the wide straps, then the frill turns overlapped very rough and ugly.

Try on the apron for the last time and sew straps in the right place. The apron is ready!

It is worth noting that in addition to the classic style apron, there are many interesting options. For example, crocheted aprons. Regardless of the technique in which the work was performed: linked from motifs or in a continuous canvas, such models are very unusual and spectacular.

If you want to stand out from the rest, you should pay attention to the beautiful aprons on the last call.

The last bell, as well as the prom night, is a very important and touching event. I want to look decent.And having made an apron for a school uniform with your own hands, you can not just look great, but also feel comfortable.

VIDEO: School apron on the last bell.

VIDEO: How to sew a white apron.

We recommend related articles.
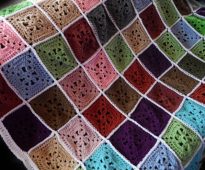
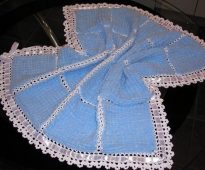
Plaid on discharge from the hospital
The very first important event in the life of the baby becomes discharge from the hospital. The task of every parent is the proper organization of this celebration. With particular care should be taken to the choice of attire ...
Knitting in patchwork style
The cover of patchwork yarn is a canvas, like a mosaic made up of multi-colored knitted patches. Such products usually turn out beautiful and unusual. There are different knitting techniques, ...
Multicolored squares of leftover yarn on a white background Knit a crochet crochet of yarn
It is difficult to guess with the number of skeins needed. Often we insure ourselves and buy obviously more. But here another question arises - what to knit from yarn residues? We have a few ideas how you can ...
Washing blankets at home How to wash a blanket?
Blankets get dirty less than bed linen - but get dirty. So they need to be washed. How to wash a blanket without spoiling the product will be described in this article. Such a wash is quite time-consuming ...
Soft figures or how to make toys from a towel
A modern child is hard to surprise. However, if you wish, even the most ordinary thing can be presented in such a way that the memory of it will remain for a long time. We are talking about toys from towels. Master classes: figurines from ...
How to crochet a rug and without a hook from old t-shirts step by step
All things over time lose their relevance and the former neat look. They can be recycled, and you can give a second life: create a rug from worn-out old T-shirts. Materials and tools Cook ...
Add a comment
By clicking a button you agree to privacy policy and site rules set forth in user agreement

Sofas

Furniture

Armchairs