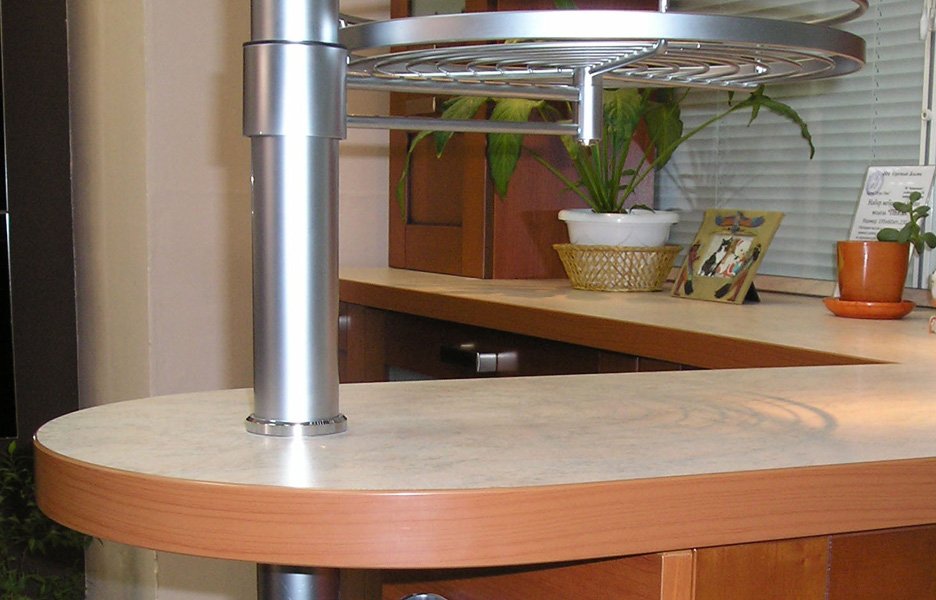
![Square table in the interior of the kitchen](https://designtop.decorexpro.com/wp-content/uploads/2018/03/kvadratnyj-stol-v-interere-kuhni-205x170.jpg)
Table for circular saw with their own hands. Drawings, photos, tips.
Circular saw is used to saw wood.
![Use hand saw](https://designtop.decorexpro.com/wp-content/uploads/2018/08/ispolzovanie-ruchnoj-pily-yavlyaetsya-ne-vsegda-komfortnym-ispolzovanie-stola-pozvolyaet-sdelat-process-raspilivaniya-bolee-rovnym-i-tochnym-590x420.jpg)
Using a hand saw is not always comfortable, the use of the table allows you to make the process more smooth and accurate
The cutting base has a plane resembling a disk, equipped with an outer edge with teeth. There are models not only of manual type, but also with the possibility of fixing on the table.
![Circular on the table](https://designtop.decorexpro.com/wp-content/uploads/2018/08/rabotat-s-bolshimi-obemami-drevesiny-obychnoj-cirkulyarkoj-slozhno-poehtomu-ee-luchshe-ustanovit-na-stol.jpg)
It is difficult to work with large volumes of wood using conventional circular so it is better to set it on the table.
There are several ways to get the latest for easy manipulation. Table saw blades can be built independently, just following a specific scheme.
![Table device](https://designtop.decorexpro.com/wp-content/uploads/2018/08/ustrojstvo-stola-dlya-cirkulyarki-590x445.jpg)
Circular Saw Table Device
Content
The advantages of creating your own hands
![Stationary table for circular saw](https://designtop.decorexpro.com/wp-content/uploads/2018/08/stol-izgotavlivayut-s-uchetom-togo-chto-ruchnoj-instrument-budet-ustanovlen-i-zakreplyon-na-stole-prevrativshis-pri-ehtom-v-stacionarnoe-oborudovanie-1-590x327.jpg)
The table is made taking into account the fact that the hand tool will be installed and fixed on the table, thus becoming a stationary equipment
The construction of the element with your own hands allows you to make the saw as suitable as possible for individual conditions. Difficulties in the process will not arise if you carefully examine the issue. You can adjust the product to the desired size, distribute everything so that it is convenient for you.
![The table for circular saw can be made by hand](https://designtop.decorexpro.com/wp-content/uploads/2018/08/sdelat-stol-dlya-cirkulyarnoj-pily-vpolne-po-silam-kazhdomu-masteru-590x289.png)
To make a table for a circular saw is fully capable of every master.
A hand-made model will be one of a kind, which makes it unique.
![Circular stand](https://designtop.decorexpro.com/wp-content/uploads/2018/08/nebolshaya-nastolnaya-podstavka-dlya-cirkulyarki-590x443.jpg)
Small desktop stand for circulars
We determine the design and construction
![Table assembly](https://designtop.decorexpro.com/wp-content/uploads/2018/08/samym-prostym-variantom-stola-dlya-cirkulyarki-yavlyaetsya-konstrukciya-iz-dostatochno-tolstoj-fanery-i-dosok.jpg)
The simplest version of the circular table is the construction of sufficiently thick plywood and boards.
The base can be made of wood or metal. For tabletops choose leafy trees. It should make a special hole for the disk. The key feature of the created table should be convenience.
![Bed for circulars](https://designtop.decorexpro.com/wp-content/uploads/2018/08/stanina-cirkulyarnogo-stanka.gif)
The bed of the circular machine
It should take care of its stability. No loosening is allowed, otherwise it will negatively affect security. At the table top should be as smooth surface. This will reduce the likelihood of injury during work.
![Tabletop device](https://designtop.decorexpro.com/wp-content/uploads/2018/08/stol-dlya-cirkulyarnoj-pily-trebuet-obyazatelnogo-prisutstviya-napravlyayushchih.jpg)
The circular saw table requires the presence of guides.
The construction can be supplemented with a special riving knife. He can be removed. It is equipped with a special disk protection that allows you to get rid of flying into the working shavings.
![Guide carriage](https://designtop.decorexpro.com/wp-content/uploads/2018/08/napravlyayushchaya-karetka-stola-dlya-cirkulyarki-590x215.gif)
Circular table guide carriage
Some remove the factory cover and change the factory platform to a homemade one. If you are not going to carry out sawing at an angle, you can remove the parts that regulate the inclination of the disk.
Blueprints
![Table layout](https://designtop.decorexpro.com/wp-content/uploads/2018/08/skhema-dlya-izgotovleniya-stola-dlya-cirkulyarnoj-pily.jpg)
The scheme for the manufacture of the table for the circular saw
Before starting work it is recommended to pass the preparatory stage. Be sure to make a drawing. This will facilitate the process of creating the structure. First, calculate the size of the table, then transfer the data to the paper. The hole being made in the facility must exactly match the size of the saw. It all depends on the type of equipment. Therefore, it is impossible to make a universal hole.The base must be stable and well able to withstand mechanical loads.
![Drawing of a circular table](https://designtop.decorexpro.com/wp-content/uploads/2018/08/chertezh-stola-dlya-cirkulyarki-svoimi-rukami-590x366.jpg)
Drawing a table for a circular DIY
It is not allowed to rebalance the structure in one of the sides. Worktop dimensions should fit the sawing flow. The final version is revealed on the basis of individual desires. Some work comfortably with a folding table or item with small dimensions.
![Machine drawing](https://designtop.decorexpro.com/wp-content/uploads/2018/08/chertezh-universalnogo-nastolnogo-stanka-590x421.png)
Drawing universal desktop machine
The drawings should take into account an important point. If the plans when working leave tools or materials on the table, then the dimensions of the table top should be increased to a square meter in area. A suitable size will be 120 by 120 cm. The drawing should be done carefully and slowly in order to do everything correctly.
![Table layout with a detailed description](https://designtop.decorexpro.com/wp-content/uploads/2018/08/skhema-stola-dlya-cirkulyarki-s-podetalnym-opisaniem-590x295.gif)
Circuit table layout with a detailed description
Necessary materials
![Homemade Circular Table](https://designtop.decorexpro.com/wp-content/uploads/2018/08/samodelnyj-stol-mozhno-sdelat-iz-dereva-590x332.jpg)
Homemade table can be made of wood
For such a table can be used wood, plywood or chipboard. Also suitable MDF and particleboard. Some prefer to choose steel or aluminum.
![Steel plate table](https://designtop.decorexpro.com/wp-content/uploads/2018/08/stol-cirkulyarnogo-stanka-iz-stalnoj-plastiny-590x259.gif)
Steel Plate Circular Table
It is not recommended to use plastic, it is completely unsuitable for a table of this purpose. If wood is chosen, then after the assembly is completed, the product should be treated with a special antiseptic composition. This will provide reliable protection against moisture and help avoid rotting.
To make the saw table yourself need to prepare materials.
- Selected raw materials for the base. The thickness should be 21 mm.
- Timber required for the frame. An edging board with a length of 3 meters with dimensions of 50 to 150 mm. Total need 5 pieces.
- Dowels made of wood with dimensions of 10 cm. At least 12 pieces.
- Joiner's glue.
- Fastenings of metal in the amount of 4 pieces.
- Corners made of metal. Enough 10 pcs.
- Screws.
These elements need to be prepared in advance and placed near the workplace.
Required Tools
In addition to the materials should be prepared tools.
Among them:
- pencil and marker;
- measurement tools, including meter and tape measure;
- jigsaw;
- manual frezer;
- grinding machine;
- sandpaper (should have medium or fine grain);
- plane and drill;
- screwdriver.
You need to prepare everything in advance and keep it handy throughout the process.
Manufacturing process: step by step instructions
![Marking the attachment point](https://designtop.decorexpro.com/wp-content/uploads/2018/08/razmetka-mesta-krepleniya-pily-k-stolu.jpg)
Marking the place of attachment of the saw to the table
![Stiffener mounting](https://designtop.decorexpro.com/wp-content/uploads/2018/08/razmetka-i-kreplenie-reber-zhestkosti.jpg)
Marking and fastening stiffeners
![Worktop for circular saw](https://designtop.decorexpro.com/wp-content/uploads/2018/08/stoleshnica-pod-cirkulyarnuyu-pilu-v-gotovom-vide.jpg)
Worktop for circular saw in finished form
To make a quality facility, you need to follow some tips. The process consists of several steps presented in the table.
Steps | Description |
1 | Bar on all sides should be trimmed with a planer. Then from it is going to frame the future of the table. In each of the sides of the table top you need to drill several holes of 5 mm. Additionally, one pass-through is performed for the legs of the product. |
2 | In the tsar are several holes of the same diameter. In the legs perform one pass-through. The diameter remains the same, 5 mm. |
3 | Proceed to install the dowels in the tabletop. Before that, they are covered with wood glue. Legs and tsargs are placed on top. In the presence of clamps with ties, the product should be secured with their help. When the glue is completely dry, you need to fasten the backs and legs, using special metal fasteners. Additionally, you should pull off with screws. Add to the construction of reliability and durability, you can use the corners. They will become an element of additional fastening, will give the product stability. For the short side, 2 pieces are enough, and for the long side 3. |
4 | The next step involves securing the saw on the product from the inside. There are several methods to accomplish the task. To fix the fit bolts M4 or bars with screws. The first case is fast and reliable. The second method does not involve additional holes, which eliminates the need for drilling.Need to do drunk in bars, whose width is equal to the dimensions of the saw ground. Next, screws and bars on both sides fasten the equipment and the tabletop |
5 | After installing the saw, you will need a larger bar. It, using self-tapping screws, fix on the basis of a design. The fastening is carried out on the marks made when placing the platform in the flat position. These manipulations will help, when removing the saw, to return it usually quickly without searching for markings. |
6 | The disk of a saw is established on the put place. The base is sawn to obtain a longitudinal hole. Then the product needs to be turned |
7 | Then begin to manufacture a parallel stop. Two strips are sawn off from plywood. Their length should coincide with the width of the table. On average, these dimensions are 10 cm. The corners should be rounded. |
8 | The resulting strip is polished. They need to be fastened at an angle with self-tapping screws. Inside should fasten a corner of metal |
9 | If you need to fix the support on the base and the structure will be used often, you should attach the guide so that it is perpendicular to the disk. Attach the roller on the bottom. This will allow him to move. |
![Leg mounting](https://designtop.decorexpro.com/wp-content/uploads/2018/08/kreplenie-nozhek-k-stolu.jpg)
Attaching the legs to the table
![Saw mount](https://designtop.decorexpro.com/wp-content/uploads/2018/08/kreplenie-pily-k-stoleshnice.jpg)
Fastening the saw to the tabletop
![Fix the start button](https://designtop.decorexpro.com/wp-content/uploads/2018/08/fiksirovanie-puskovoj-knopki.jpg)
Fixing start button
The design is made and ready to use. When performing the described manipulations, it is important to remember to observe safety measures. Concerns and any manipulations with a circular saw.
Regularly check the position of the table and its strength. The design should be stable, without loosening.
![Sample made desktop](https://designtop.decorexpro.com/wp-content/uploads/2018/08/primer-izgotovlennogo-rabochego-stola-dlya-cirkulyarnoj-pily.jpg)
Example of a worktable for a circular saw
![Table option with lifting mechanism](https://designtop.decorexpro.com/wp-content/uploads/2018/08/variant-stola-dlya-ruchnoj-cirkulyarnoj-pily-s-mekhanizmom-podema-590x398.jpg)
Option of a table for a manual circular saw with the mechanism of rise
First make sure that the saw is securely fastened, only then turn it on. You can not hold the material cut by hand. This will help prevent wood from falling into the face when the knots start to bounce off. Additionally, it is recommended to use special goggles when working.
![Protective glasses](https://designtop.decorexpro.com/wp-content/uploads/2018/08/dlya-bezopasnosti-obyazatelno-ispolzujte-zashchitnye-ochki-590x436.jpg)
Use safety glasses for safety.
These simple tips will help to avoid injury in the workplace.
Video: Circular table made of scrap materials
![Square table in the interior of the kitchen](https://designtop.decorexpro.com/wp-content/uploads/2018/03/kvadratnyj-stol-v-interere-kuhni-205x170.jpg)
![Make jumpers](https://designtop.decorexpro.com/wp-content/uploads/2018/05/iz-bruskov-takogo-zhe-ili-menshego-razmera-izgotavlivaem-peremychki-i-krepim-ih-k-nozhkam-samorezami-205x170.jpg)
![pvc hem on the tabletop](https://designtop.decorexpro.com/wp-content/uploads/2017/03/kromka-pvh-na-stoleshnice.jpg)
![](https://designtop.decorexpro.com/wp-content/uploads/2017/11/zhurnalnyj-variant-ili-stol-v-slozhennom-vide-e1511727133661-205x170.jpeg)
![Computer tables under the order](https://designtop.decorexpro.com/wp-content/uploads/2017/06/Kompjuternye-stoly-pod-zakaz.jpg)
![table transformer](https://designtop.decorexpro.com/wp-content/uploads/2017/11/neobychnyj-dekor-gostinoj-s-zhurnalnym-stolikom-transformerom-205x170.jpg)
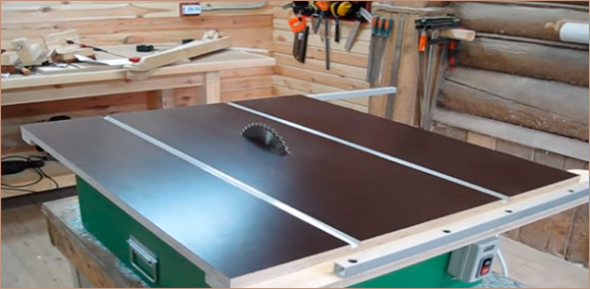
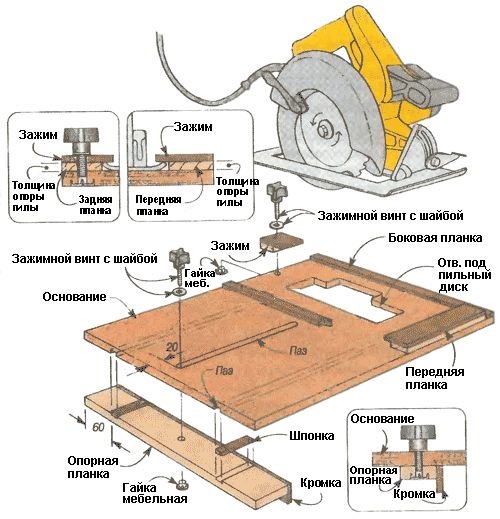
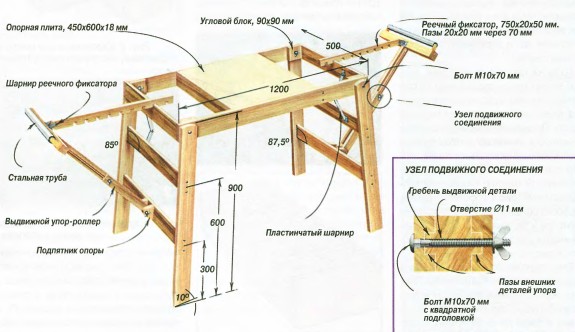
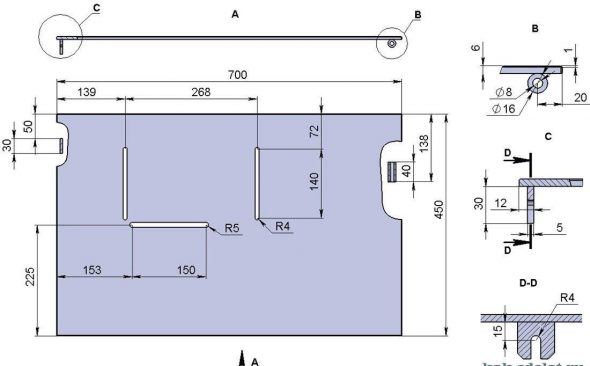
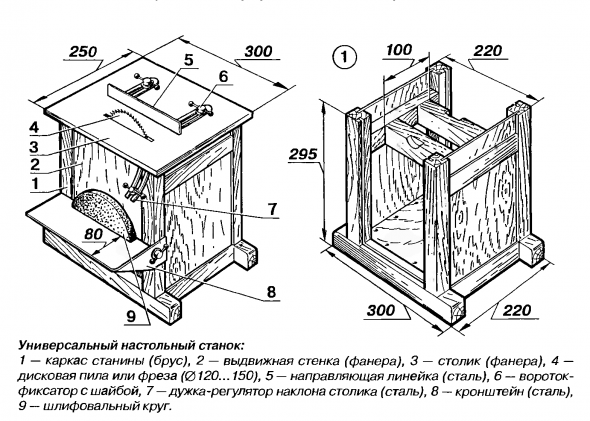
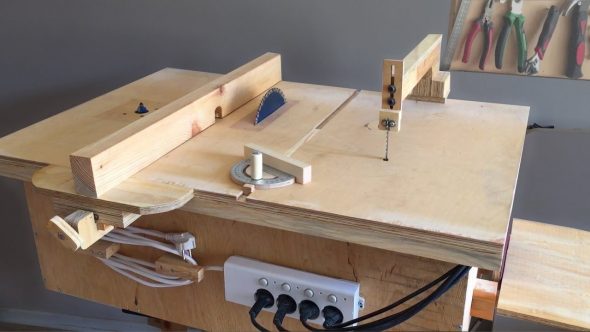
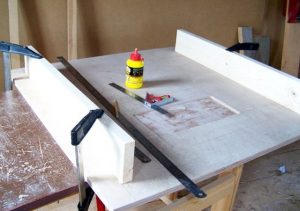
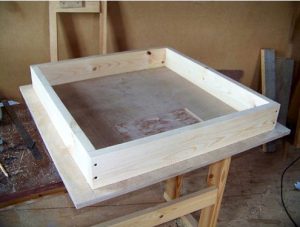
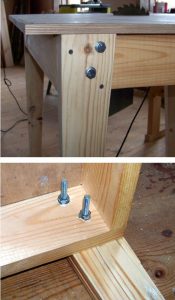
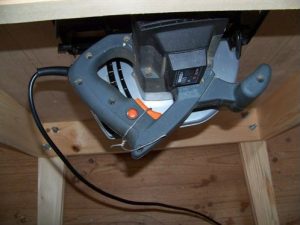
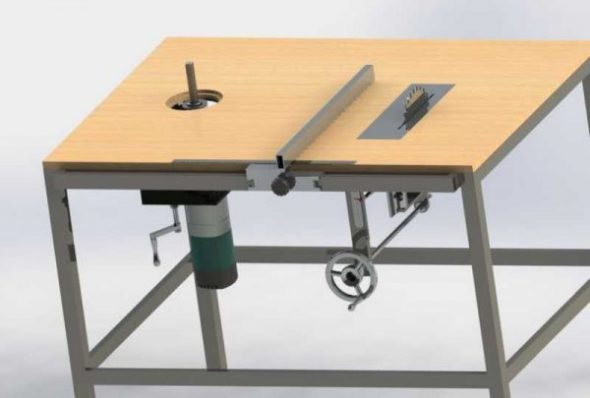
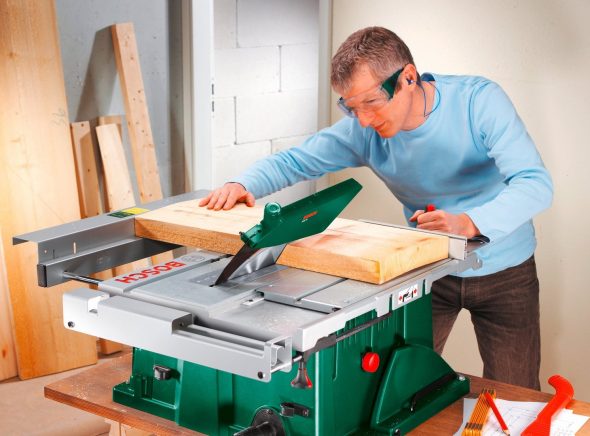
Thanks for the interesting article! You have been very helpful in making your own circular table!